 Minecraft Texture Packs Minecraft Resource Packs
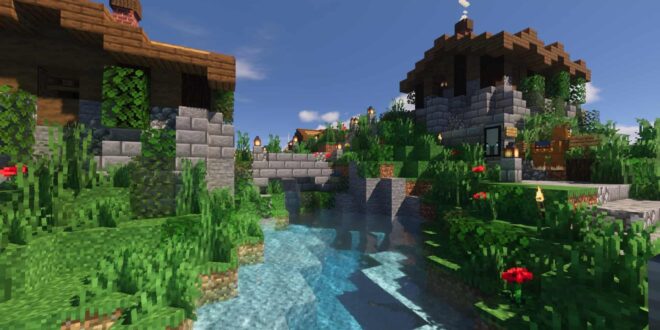
Shader packs have very specific roles in Minecraft and many resource packs use their features to improve their visuals. They are not that easy to create and they take a bit of knowledge and dedication to get them to have the desired effect and to work properly. Voyager shaders, now known as Voyager 2.0 due to its major changes compared to the original version, is one of the most well-known and praised shader packs. The Voyager 2.0 shader pack was originally released in May 2021. Since then, it has seen hundreds of thousands of downloads. Even though the shader pack only works with particular versions of Minecraft and works only with Optifine, it maintains high popularity. The original developer, known in the community as symbiome67, released version 2.0 to address a bunch of issues and optimizations of the first version and to add some new effects. Since Voyager 2.0 is considered a rather new release, being just over one year old, the developer remains active and puts up updates and bug fixes frequently. He is still active on his Discord channel where users can report bugs. Minecraft is by no means a game with realistic graphics. It does not even try to be anything else but a fun, blocky, cartoony sandbox game. Voyager 2.0 touches upon certain aspects of the game that have to do only with lighting effects. The first thing that hits you when you load up Voyager 2.0 over vanilla Minecraft is the sky. Cloud textures have been changed. They are now smoother and have less pixelation and blockiness. They look as you would expect clouds to look in a AAA game. The same thing can be said about the Sun and Moon. Both look realistic in terms of shape and lighting. Speaking of lighting, sun rays are much more realistic, almost photorealistic. When the Sun goes down, you get to see an amazing orange sky. As the stars light up, the Moon rises, painting an amazingly realistic picture of the night sky. The light from the sky also means that it has some amazing effects on the terrain. Shadows in particular look considerably better.
Edges have been smoothened out and they look more like real shadows. Another important visual improvement that Voyager 2.0 brings is the water texture. With Voyager 2.0 installed, water in Minecraft looks as genuine as you would expect. Water effects are considerably improved. Even water reflections have been improved to be more realistic but the biggest improvement is the lighting effect over water bodies. All the above-mentioned effects may not have a considerable impact on their own. When you put everything together, Voyager 2.0 makes Minecraft look stunning, even if you do not have a resource pack installed. It is nothing short of amazing how much was achieved just by improving lighting and particle effects, and all was done by a single community member. If we are talking about shader packs, you need to take the hit in terms of game performance. Voyager 2.0 will lead to a framerate drop, especially if you are using an older generation of nVidia or AMD video cards. Unfortunately, Voyager 2.0 does not work with Intel video cards and there is no indication if it ever will. However, Intel video cards may not even be able to run the game at a reasonable framerate with Voyager 2.0 installed. Also, since most of the effects and reflections are achieved using ray tracing, which is supported by modern video cards, Intel video cards do not yet have such capabilities. Most users report seeing only a white screen on computers using an Intel video card. On modern systems, Voyager 2.0 should not make the game unplayable, however, due to the impact it can have over game performance, it is not recommended to PvP players. Installation of the Voyager 2.0 shader pack can only be done with Optifine HD as recommended by the developer. Players running Minecraft version 1.16.5 should use Optifine HD U G8. For Minecraft version 1.17 or newer, Optifine HD U G9 is recommended. It is important to note that Voyager 2.0 supports several popular mods including Biome o Plenty, Botania, Abnormals automnity, Desolation, Astral sorcery, and more. The shader pack may cause visual artifacts or bugs with certain resource packs. Bugs can be reported to the developer using the official Discord channel.