 Minecraft Texture Packs Minecraft Resource Packs

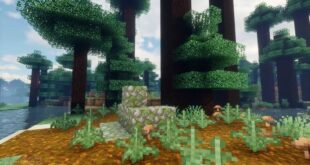
Shader packs often get overlooked and may not get the love that they deserve. While it is true that some shader packs do little for the game, there are a few gems that simply make Minecraft a lot more pleasant to look at. Lighting is an important part of the game and the Tea Shaders highlights this more than most other shaders. When hearing the name Tea Shaders, you may be tempted to think that it is a pack that messes with the lighting, causing lighting to maybe get a green hue. It can be misleading as it may cause you to think that it does something when in reality, the Tea Shaders pack does something completely different. It takes the lighting in vanilla Minecraft and takes it to a whole different level. If you are one of the few that did not hear about this particular shader pack, maybe not it is the right time to test it out as once you start using it, it will be difficult to play Minecraft without it. One of the common complaints that people have with Minecraft, besides its blocky models and pixelated textures is the lighting. Colors can be bland and lighting effects are anything but impressive. They look and feel dated, making the whole game just a bit less enjoyable. The Tea Shaders pack addresses many of these things. Amongst the many improvements it brings to the game, grass and leaves are the most noticeable. With the shader pack on, everything that is green in the game, meaning vegetation, has more vibrant nuances, making the world look more alive.
You will also notice that autumn grass and leaves also look different in the sense that they reflect better the colors of the season. Another important improvement that the Tea Shaders pack brings is water and water reflections. The water in vanilla Minecraft appeared as if it was made of cubes of blue jelly. This time around, the water looks more legalistic with better reflections and refraction effects. It is easier to see objects in water and the textures appear closer to what you would see in modern age games. Beyond the improvements to waving grass, leaves, and water, the shader pack comes with a bunch of other features. There are some improvements to FXAA, SSAO, HDR support has been added, tonemapping, and even customizable fog. Many of these improvements can be seen during daylight but they become even more obvious during the night. If you want to see just how much of a difference the Tea Shader pack makes, you can run the game without it, take some screenshots then compare them with screenshots of the same items and places with the shader on. Just to ensure that you have your expectations right, the Tea Shader pack does not mess with textures. Yes, textures look better but that is due to improvements to lighting. Also, you may notice a small framerate drop when using the Tea Shader pack as it demands more resources to process and improve lighting in the game and to add features that may not be present in vanilla Minecraft.