 Minecraft Texture Packs Minecraft Resource Packs

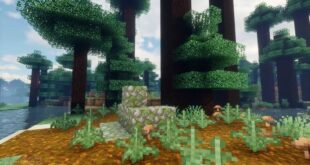
We get to see a lot of great Minecraft projects being abandoned. Super Duper Vanilla Shaders takes inspiration from a canceled project and attempts to improve the visuals in Minecraft without replacing textures or bumping up their resolution to absurd levels. It is a shader pack that through the magic of lighting, it sets the ambitious goal to make vanilla Minecraft more photorealistic and modern. Lighting plays a very important role when it comes to visuals and Super Duper Vanilla Shaders is a great example of what the Minecraft engine can achieve when pushed. Super Duper Vanilla Shader pack has a very interesting history that ties it to Super Duper Graphics Pack. Super Duper Graphics pack was initially announced at E3 2017. Sadly it was canceled in 2019. Super Duper Vanilla Shaders aims to convey some of the visual style presented by the canceled Super Duper Graphics pack. Released in 2021, Super Duper Vanilla Shaders managed to become one of the most popular shader packs released. It managed to get hundreds of thousands of downloads and keeps on getting constant updates from the developer. Today, Super Duper Vanilla Shaders is being distributed by FlameRender Studios. It still credits user Eldeston for the creation of the pack. While many are satisfied with how vanilla Minecraft looks in terms of visuals, nobody can deny the benefit of using Super Duper Vanilla Shaders. The pack itself was designed to be installed over vanilla without using a resource pack. This is how it was developed in the first place. This means that it preserves the visuals of the game exactly how they were intended but adds a more capable shader and lighting system. With Super Duper Vanilla Shaders installed, several aspects of the game will be changed for the better. The most striking improvement is done for lighting and light flares. The light from the Sun, Moon, fire, and illuminating objects looks considerably better.
There are stunning solar flares and you can now notice light rays protruding trough the sky and clouds. It looks much closer to how natural light would look. Another important change is the sky texture. Clouds remained the same but the way light is projected onto them is different but for the better. The Sun and Moon are now rounded and emit light in a much more natural way. Looking at the ground, Super Duper Vanilla Shaders introduces new and improved shades and shadows. The shadows projected to the ground are much more realistic in the sense that they better reflect the object that casts the shadow. They are also much smoother. For water, the developer did change the textures to make it much more realistic. The way light behaves in water has been changed. Light is now refracted in water in such a way that it is closer to what you would see in real life. Also, reflections appear much more natural. There are a few other subtle improvements that may be difficult to spot or may go unnoticed. For example, shadows have auto-exposure which makes them look less static. Another example is the weather effects. They have also been improved. Things such as gamma correction and bloom rendering also received much-deserved attention. The new and improved bloom rendering makes sunrise and sunset look stunning. There is no shader pack for Minecraft that would not affect game performance. Shader packs are more taxing than regular resource packs and Super Duper Vanilla Shaders are no exception. They can cause a noticeable framerate drop especially if you are using older hardware. Modern hardware should handle the shader pack just fine. However, if you enjoy how vanilla Minecraft looks, it may be worth sacrificing a few frames per second to have Super Duper Vanilla Shaders installed. It makes the game look great without compromising the original textures. To install Super Duper Vanilla Shaders, you need to use Optifine. Like all shader packs, Super Duper Vanilla Shaders requires access to special features. It will not work if you try to install it manually like a regular resource pack.