 Minecraft Texture Packs Minecraft Resource Packs

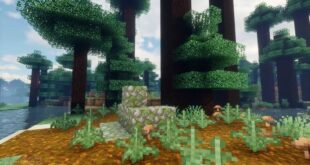
Lightweight assets have taken the Minecraft community by storm, with the Potato shader pack paving the way for the rest. Its name refers to low-end PCs that have trouble running the latest and greatest shaders, which is why Potato was designed to perform quite well regardless of the hardware that it’s being executed on. Although it’s been on the market for a bit over 2 years, it’s still quite popular due to the unique approach and frequent updates. The developer of the Potato shader pack, RRe36, mostly focuses on creating highly performing shaders, and this one is no exception. However, unlike some other releases, Potato omits most of the advanced features in an attempt to retain as much FPS as possible. While it can be used right out of the box, it does have some built-in, customizable options that players can modify to their liking. It manages to strike a perfect balance between performance and visual quality. If your Minecraft world has plenty of bodies of water, you’ll be pleasantly surprised once you load it up with these shaders turned on. Besides the improved appearance of everything from the shadows that trees cast to the sun’s rays, Potato also introduces a custom water model. The color is a deep, dark blue that provides quite a nice contrast to the baby blue sky and also fits in extremely well with the new, improved shadows. Sunlight brings a more realistic interpretation with the help of bloom, a graphical effect used to create visually appealing lighting effects through the combination of a blurring and blending process. This is also noticeable when you place torches, around glowstone, lava, etc. In order to further improve visuals with a limited amount of high-end properties, Potato shaders take advantage of tone mapping. This is a technique that compresses large amounts of data referring to colors and lighting, outputting it in a way that mimics a realistic representation but using far fewer resources. Your mediocre Minecraft builds can completely transform their appearance simply by loading up these shaders.
While they still won’t be able to fully imitate the quality of some more demanding shader packs, it’s still an impressive change for their low requirements. Ambient occlusion is tasked with providing an increased level of realism. It adds to the intensity of places with low light. This can be quite noticeable in areas such as desert and jungle temples, where the only source of light are torches. All of these effects are further boosted by the use of normal maps that enhance the appearance of 3D surfaces, adding a lot more depth to them. Cobblestone, bricks, trees, and even grass blocks will display much more complex surface details than before. As far as modifiable settings go, these shaders provide a lot of customizability. This includes a new depth-of-field slider that replaces the default Minecraft one. Instead of overly exaggerating one or the other extreme, it implements solid functionality that can be useful for many in-game scenarios. The custom water has a couple of toggles as well, where players can even choose to completely turn it off. Lastly, players have the option to turn anti-aliasing on or off. This feature can slightly improve the jagged edges that some shadows might have, but they still aren’t going to be flawless. In terms of system requirements, Potato shaders are pretty mild. You can choose to use either Optifine (version 1.12 and newer) or Iris (version 1.5.0 and newer). The only hardware that your PC must have is a graphics card with support for OpenGL 4.0, as well as a Windows or Linux operating system. If you’re using Windows, keep in mind that Potato shader pack won’t run on Intel HD 5000 Series graphics cards due to faulty Intel drivers. The developer has been releasing an update for the shader pack roughly each month. Also, there are 0ver 250k downloads, which is a testament to its popularity. The installation is straightforward as with any other pack, and the level of customization is yet another plus. Whether you have a poor PC or just want to join thousands of other players who discovered everything that Potato shaders have to offer, there’s no reason not to try them out.