 Minecraft Texture Packs Minecraft Resource Packs

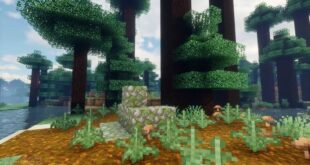
When Minecraft was originally released, it was a revolutionary game and it still is today. However, the visuals in vanilla have not held up well. Fortunately, due to a dedicated community, Minecraft is the great beneficiary of many great resource packs and shader packs. RedHat Shaders is one of the many packs that aim to improve lighting effects, reflections, clouds, sky textures, and more. While it does not attempt to do anything revolutionary, RedHad Shaders manages to get plenty of things right where many shader packs fail. RedHat Shaders was developed by community user mlgimposter. He has a few other projects under his belt and despite having released RedHat Shaders in early 2021, he had plenty of experience to develop it. What stands out about this shader pack is that it managed to get a large following in less than a year. With over 500,000 downloads across several sites where it has been published, the pack outshined many other packs that were considered popular. The benefit of having a shader pack released just a couple of years ago, RedHat Shaders benefits from regular updates and an active developer that is still engaged with the community. He is still active on his Discord channel, staying in touch with the members that use his shader pack. Right off the bat, it is important to mention that RedHat shader pack is based on the old Chocapic13 shader pack. It took the great parts of Chocapic13, improved them, and then added some new features and improvements. As mentioned in the beginning, RedHat Shaders only focus on lighting effects and a few other visuals in Minecraft. The moment you load up the shader pack, you will notice that light glares are less grainy and much more natural. Objects looked at from afar, have less scatter and are much easier to distinguish. This is also due in part to the field and depth of view tweaks that come with the shader pack. Having the improved lighting effects also makes textures look better. This effect would complement a well-made resource pack to make the new textures stand out even more.
The developer also added several lighting effects that add a cinematic vibe to the game. Lens Flares, Grain, Tilt Shift, and more have been added to improve Minecraft to a noticeable level. Additionally, there are effects introduced that are related to movement. There is a bit of motion blur and the Waving Hand and Waving camera effects become noticeable when you move around with your character or shift the camera around. Another aspect of the game that was changed and improved in RedHat Shaders is the sky textures. There are new textures for clouds, making them look realistic and there are new textures for the sun and moon. Other atmospheric effects such as fog and rain have also been improved to appear more realistic. Lastly, reflections have been improved. This can be observed on all surfaces but it is much more noticeable when looking at the water. The improvement also affects shadows and light absorption of certain objects. When looking at water, a noticeable difference can be observed in how objects are projected as their reflections are considerably better. Game performance is always an issue when it comes to shader packs. Fortunately, RedHat Shaders offers plenty of customization when it comes to what features to have enabled. Some of them will be very taxing in terms of FPS, especially when installed on older computers. A modern PC should be able to handle the shader pack. It can get worse if you have RedHat Shaders installed along with a resource pack that bumps up the texture resolution but a considerable margin. Textures with a resolution of 256 and up will severely cripple your FPS. However, on its own, RedHat Shader is nowhere near as taxing as other shaders as it does not use modern features such as Ray Tracing. According to the developer, RedHat Shaders can be tweaked to work on a medium-range computer that is running with an Intel Iris GPU. Installing the resource pack can be done with tools such as Iris or Optifine. It works with newer versions of these tools and supports Minecraft versions from 1.7.2 up to 1.19 as well as 1.18.2.